Tech Tip Tuesday 3 Ways To Take A Screenshot In Windows 10 ¬´ Library and Information Technology Services LITS Allegheny College Meadville, PA

21 Kasım 2022 | Okunma | Genel
Select the screen capture option as per your choice from the Big Eye toolbar. You can also share the screenshot after editing directly from the app itself without having to save it. Once you click on New, you’ll see a toolbar at the top of your screen showing options like Rectangular Snip, Freeform Snip, Window Snip, and Fullscreen Snip. After launching the snipping tool program, open a menu that you want a picture of. When using Windows 7, hit the Esc key first before opening the menu.
- After you select the camera icon, you can choose to record some or all of the screen by dragging the mouse around the selected area before you record.
- In addition to the standard rectangular snip, you can snip in three other ways.
- Here are the methods you can use to sign in without any additional equipment.
- Because of this, it’s highly recommended to use the PNG or JPEG format.
Once the drive is ready to use on the Pi, you can use it locally as extended storage or share it over the network to feel the effect of a personal file server or a NAS. We have shown how to set up a NAS on the Raspberry Pi on a different blog post. Please read the post and leave your comments there.
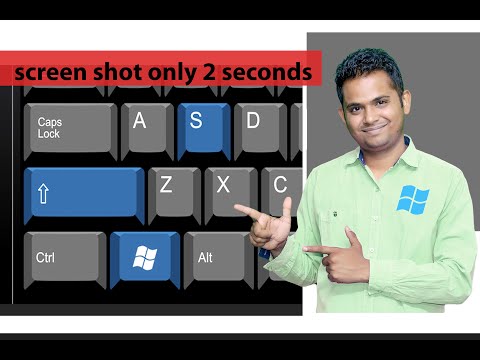
Use Keyboard Shortcuts with Game Bar in Windows 10
There’s nothing more frustrating than trying to find a screenshot urgently but it becomes time-consuming and impossible. This might happen if an individual takes multiple and frequent screenshots and these are not sorted in a way that they can easily find. This will either be on their taskbar or can be accessed by selecting File Explorer from the menu. Right-click on the OneDrive folder and select settings.
Click the menu to take a rectangular, free-form, window, or full-screen capture . Once the screenshot’s taken, it’ll be saved to your clipboard, as with the Prt Scr key option. If you hit the keys correctly, your whole screen will flash, indicating the screenshot has been taken and automatically saved. Click on the preview notification to open the Snip & Sketch app and edit the screenshot with the available drawing tools before saving or sharing. Once you have captured the screenshot, Snip & Sketch app will open and you will see your screenshot. Here you can add annotations with a ballpoint pen, a pencil, or a highlighter.
How do I take a long screenshot app?
There are many simple ways for you to get a Windows 10 http://driversol.com/articles screen capture, and we have provided solutions for every possible scenario you may encounter. The ability to take screenshots on Windows 10 is useful to convey ideas quickly and act as an immediate guide or proof if the need arises. Screenshots are easy enough to take on your phone but taking screenshots on Windows is not so straightforward. Click and drag the cursor to select the area of the screen you would like to use, and release the cursor after you’ve selected the area you wish to capture. Screenshots can be a very useful way to store and share what is on your computer’s screen. Here are a few different ways to take screenshots in Windows.
And like ShareX, once you finish editing your screenshots you can upload the results to services like to Box, Dropbox, and Imgur. If you’re happy with the result and don’t see any sensitive information exposed in the recording, save it as a zip file and it’ll be ready to share with others. Our favorite free screenshot tool for Windows‚Äîaside from the tools built into Windows 10 itself, which are extremely capable‚Äîis Greenshot. It‚Äôs free and open-source, and it‚Äôs packed with additional features like customizable keyboard shortcuts. The Print Screen key on your keyboard can take a screenshot. Depending on the keyboard shortcut you use, you can save the screenshot as a PNG image file or copy it to your clipboard so you can paste it into any application.
I’ve done another clean Mint install selecting “something else” after creating an ext4 partition over the whole USB stick. I’ve just reinstalled Mint on a USB that was partitioned as an ext4 partition over the whole drive. The desired start and end points of the partition are defined last. Since the –align opt flag is used, parted will adjust the size as needed to optimize drive performance, but these numbers serve as a guideline. If you’re not sure what a filesystem is, it’s probably easier to understand the concept by learning what happens when you have no filesystem at all. If you have a spare drive that has no important data on it whatsoever, you can follow along with this example.
ANINDA HABER İÇİN BEĞEN'E TIKLAYIN !
Yorumlar
Facebook kullanmıyorsanız sitemiz üzerinden de haberlerimizi yorum yapabilirsiniz !